Affichage des articles dont le libellé est Pottery Tutorial. Afficher tous les articles

Handles are not only functional for lifting pieces but they are also pleasing to look at. Pulling the handle and attaching it involves making some decisions about size and shape. A handle should always be strong enough to support the weight of the piece. Also, if the piece might be used to lift something, like a pitcher with water, the handle should be strong enough to lift the piece plus its contents.
Take the clay and pat it into the shape of a carrot.

(Pulling the length of the clay)

Wet the clay and your hand and begin pulling the clay into a long handle in a stroking fashion. You can not do this in one pull. Pulling a handle may take 50 pulls or more. Each pull will make the handle just a little longer.

(Let the handle sit to firm up)

After the handle is the correct size, let the handle firm up, by placing it off the edge of a table. This handle has been lifted back to the top so that the curve of the handle will already be made when the handle firms up.

Attaching the Handle

(Both pieces are ready)

When the piece you are attaching the handle to is leather hard and when the handle is firm you can attach the handle.
(Scratch the cup where the handle will be attached)

Using a sharp pencil or a needle tool - scratch the piece where the handle will be attached.

(Press the top of the handle into place)

Scratch the handle where it will attach to the piece and press the handle in place. It is a good idea to put slip on both pieces before pressing it on. Some potters use white vinegar on the attachment areas.

In this section you will learn how to put clay slabs together to make a piece of pottery. Slab construction can have great results if you take your time and do not rush the process.
(Spreading the clay)
Begin with a smooth flat surface. Place newspaper or cloth over the surface to prevent the clay from sticking to your work surface. Spread the clay out by patting it with your whole hand.

(Flipping the clay)

To flip the clay over - carefully hold top and bottom of the clay with the palms of your hands. This will prevent the clay from tearing while you are flipping it.
(Rolling out the clay)
To help you roll your clay to an even thickness, place a yard stick on each side and roll out until the clay is the same thickness as your yard stick.
(Cutting your slabs)
Use a ruler to help you cut a straight line. (Tip: If you want a 90` corner - lay a piece of paper over the clay to show the 90' corner.)
(Let clay firm-up)
After you cut out your bottom and sides, let them sit until the clay is leather hard. For most clay's this will take about an hour.
(Score or Scratch the edges)
When your clay is leather hard use a needle or sharp pencil to scratch the edges of the clay where the clay will be joined together. A criss-cross pattern works well for this.
(Apply slip to edges)

Make some slip by watering down a small amount of clay until it is the consistency of yogurt. Apply the slip to the areas you just scratched.

(Applying the slip)

Some potters use white vinegar instead of slip. I have not had good experiences with vinegar. I find I get more cracking in my pieces so I mainly use slip.

(Joining the pottery)

When placing the edges together slide the two surfaces together in a slight back and forth motion to strengthen the bond between the surfaces.
(When you have a good bond)
With experience you will get the feel of a good bond. You will know you have a good bond when most of the slip has squeezed out between the two surfaces being joined together. Also, the clay will not want to slide back and forth easily.
(Add a coil to the inside seam)
To make the seem stronger place a coil in the corners of the piece. Gently press the coil into the corner. Be careful not to break your corner away.
(Smoothing out the coil)
I like to use the top end of a brush to smooth out the corners. Notice my other hand holding the corner so I don't break it away.
(The final touches - Corners)
I use a damp brush to smooth out all the corners so the seams are no longer visible.
The final touches - Top edge)
To smooth out the top edge use a wet paper towel and carefully slid the towel up and down the length of each edge. This will round the edges so they will not be sharp.
(Measuring for a top)
If you plan to make a lid measure the length and width of the piece and write down the measurements. The piece will shrink as it dries and you will need these measurements to make the lid.
(Finishing touch - Handles)

This is another technique using coils to construct a piece of pottery. This technique involve both making coils and pressing them into a pattern.
(Roll coils)
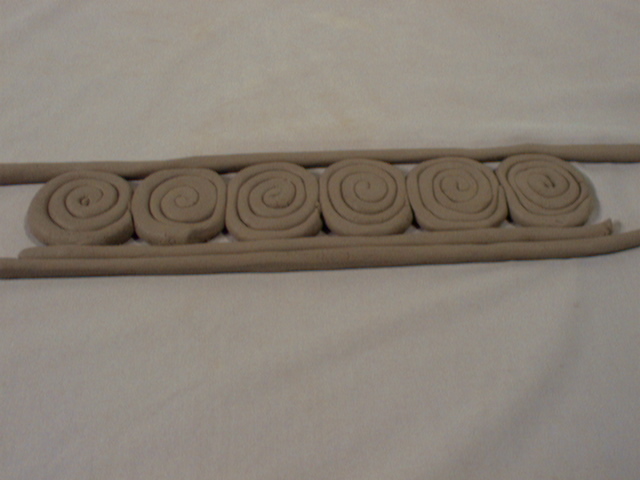
Roll coils in a circular fashion.
(Make a pattern)
Line up coils rolls as seen here. Then place a couple coils on top above and below the coil rolls.
(Fill in gaps)
Press a ball of clay in each gap that you can see through.
(Scrape and Smooth)
Scrape all the coils together. Don't worry about the other side, your coil pattern will still be visible.
(Straighten edges)

After the coils have been scraped and smoothed, you might want to straighten the edges by tapping a yard stick against the edge. Your piece is now like a slab, however, your coil pattern will still be visible on the other side.

(Lift carefully)

Carefully lift your coil slab.

(Make a bottom)

Cut out a shape for your bottom. I used a cup as a guide for my bottom.

(Bend and attach to the bottom)


Carefully bend the coil slab around the bottom you cut out.

(Smooth the bottom)

Flip over your piece then scrape and smooth the bottom. A finger that has been dipped in water works great for smoothing.

(Finishing touches)

On the area where the coil slab was put together use a pencil and draw the coil pattern back onto the piece.

(Finishing touches - Smooth the top edge)

Smooth out the top and you piece is ready to dry slowly. It is important to dry the piece slowly because the grooves from the coils will crack if drying occurs too quickly.

In this section you will learn how to make coils and how make pieces of pottery with them. Coil pottery is a simple technique that can have great results.
(Roll out coil)

Squeezing the clay into a coil or rolling between your hands are two ways to make coils. This technique can be difficult to make a smooth round coil because of the uneven pressure from your hands and fingers.
(Roll out coil)
When hand rolling coils, use a smooth surface and spreading your hands to apply even pressure. Gently roll the clay back and forth.
(A good thickness)
Roll the coils so that they are a little thicker than a pencil. Then stack the coils one on top of another.
(Scrape inside)
For strength, force the clay together on the inside of the piece. Use you finger and scrape the top coil onto the coil under it.
(Smooth inside)
When smoothing the inside of the piece hold you other hand on the outside so you do not damage what you have completed already.
(Leveling the top)
If you want the top level, gently turn your piece over and lightly tap it on a smooth surface.
(Dry slowly)
When you are finished with your piece let it dry slowly. The grooves in the piece are weak spots and if this dries too quick it will crack.


With pinching gestures, you can mold clay into objects such as animals or even make a bowl. While this form of pottery seems really basic, you can get a feel for the clay you are working with and you will get to know the limits of your cla
y. (Does it bend easily? Does it dry fast? Etc.)

To make a bowl...
(Begin with a ball of clay)

Begin with a ball of clay. Push your thumb into the center. Then pinch up the walls.

(Turn the piece as you pinch)

Turn the piece as you pinch. This will help you to keep an even thickness in the walls of the piece.

(Flatten the bottom)

Gently pat the bottom on a flat surface to create a flat spot on the bottom of the piece.

By : http://pottery-and-ceramics.blogspot.com